Adding New Records and Closing Records - Customer Request Records
The Customer Request form contains two tabs - Requests and Work Tickets, as shown below.
To enter a new Customer Request, fill in the required fields based on the information provided by the customer in the Request tab.
The Work Ticket tab can then be populated to generate any action that is to be taken as a result of the customer request.
Requests Tab
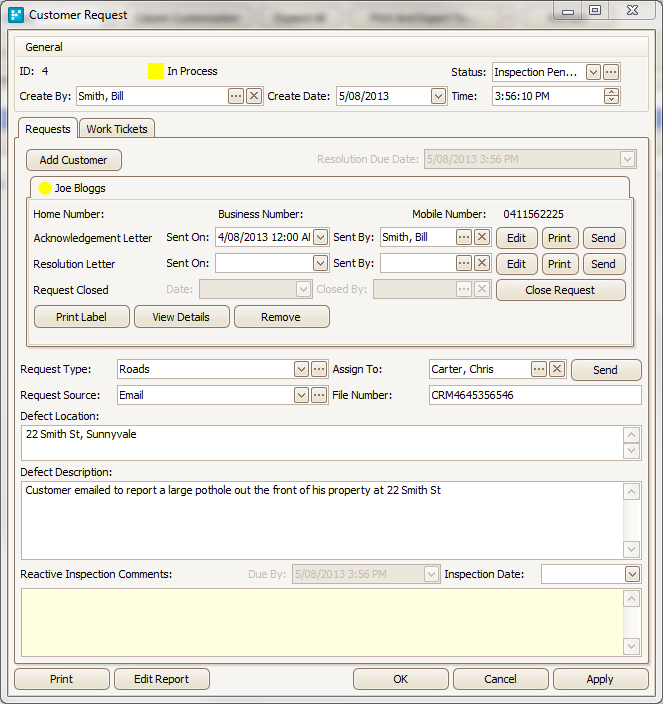
Customer Request form - Requests tab
The requests tab contains the following fields:
Create By:
- If you are logged into myData with a username and password, your name can be populated automatically when you create a new Customer Request record.
- If this is not happening, please contact your system administrator to ensure that your login has been properly linked to a myData contact.
- To add a person to the Create By field manually, click on the ellipsis button (...), select the name of the person you want to add from the Address Book and click Assign.
- If the required contact is not yet listed, add a new contact.
Create Date/Time:
- These fields are automatically populated upon creation of the customer request.
Add Customer:
- Click on the Add Customer button and select the name of the customer lodging the request from the Customer list form.
- Click Assign to associate the customer request to the selected customer.
- Please note that each request can have multiple customers, allowing you to associate one defect to any number of customers who report it.
- f the customer does not appear in the Customer List, hit the Add New button and enter their details into the Add New Customer form.
- Please note that you can add multiple customers to the same customer request record.
Acknowledgement Letter:
- Edit, print, or send an acknowledgment letter to the customer/s by clicking on the appropriate button.
- To track customer notification status, enter the date that the acknowledgment letter was sent and the person who sent it.
Resolution Letter:
- Edit, print, or send a resolution letter to the customer/s by clicking on the appropriate button.
- To track customer notification status, enter the date that the resolution letter was sent and the person who sent it.
Request Closed:
- Click the Close Request button to signify that all customers have been appropriately notified of the Customer Request status and no further contact is required.
Request Type:
- Click on the drop-down arrow and select the request type from the list provided.
- To add any additional request types to the list, do so by clicking on the ellipsis button and choosing Add.
Assign To:
- Click on the ellipsis button and select the name of the person who is to be responsible for following up and/or inspecting the defect reported in the customer request.
- If the required contact is not in the list, please proceed to add a new contact. Click Send to notify this person via email.
Request Source:
- Click on the drop-down arrow and select the source of the request from the list provided.
- You may add additional request source entries to the list by clicking on the ellipsis button.
File Number:
- If there is a file number associated with this customer request (e.g. from an external system), this may be entered here.
Defect Location:
- Enter the details of the defect location based on the customer's description.
Defect Description:
- Add a description of the defect as reported by the customer.
Due By:
- An inspection due date will appear if this has been set up in the Customer Request Configuration tool.
Inspection Date:
- If an inspection of the defect is to take place, please use the drop-down arrow to enter the date that this inspection should take place.
Reactive Inspection Comments:
- Once an inspection is carried out to verify the reported defect, add any made by the inspector may be entered here.
Work Tickets Tab
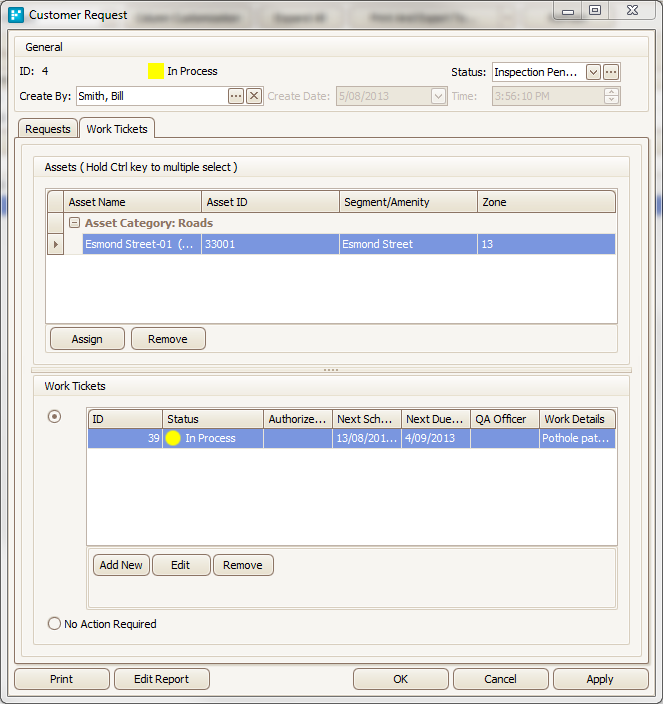
Customer Request form - Work Tickets tab
The following functions may be carried out on the Work Tickets tab:
Assigning Assets: If not already done, an asset can be assigned to the customer request by clicking the Assign button to activate the Advanced Asset Search window.
Using the tools provided, locate and highlight the desired asset(s) before clicking Select Asset to assign the asset(s) to the request.
Adding Work Tickets: If work is required to take place as a result of the customer request, proceed to attach a new Work Ticket to the request by clicking Add New, and following the instructions. The No Action Required radio button can be activated if no works are to take place.
Ok/Cancel/Apply: OK saves and closes the Customer Request form, Cancel closes the Customer Request form and discards any changes, Apply saves the Customer Request and keeps it open.
Print: The customer request can be printed in report form by hitting the Print button.
